Prerequisite
#1) You must enable Basic Authentication over SMTP on your MS 365 instance.
|
To enable Basic Authentication for SMTP on Microsoft 365
Install-Module -Name ExchangeOnlineManagement -RequiredVersion 2.0.5
Set-ExecutionPolicy RemoteSigned
Import-Module ExchangeOnlineManagement
Connect-ExchangeOnline -UserPrincipalName troy@tntware.com
Set-TransportConfig -SmtpClientAuthenticationDisabled $false
Set-CASMailbox -Identity troy@tntware.com -SmtpClientAuthenticationDisabled $false
Disconnect-ExchangeOnline
|
Be sure to replace troy@tntware.com with the email address you're using to send receipts from.
Your MS 365 instance may require additional steps. These instructions were based on this MS article and this MS article.
As of September 2024, this article from Microsoft seems to have the most comprehensive information:
How to set up a multifunction device or application to send emails using Microsoft 365 or Office 365
SMTP Settings
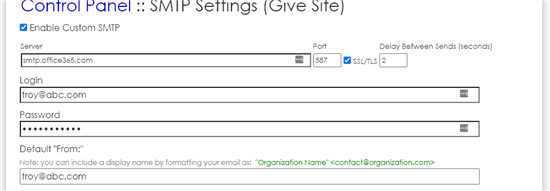
In the Staff Portal control panel, in the SMTP Settings for the Staff Portal and/or Give Site, click "Enable Custom SMTP".
Then enter the following:
Server: smtp.office365.com
Port: 587
SSL/TLS: True
Login: Your email address
Password: Your password
Default "From": Your email address (with Display Name optionally included)

Then, click "Test Settings" below to make sure everything is working. Then click "Save Settings".
If you receive error, "5.7.57 Client not authenticated to send mail":
https://learn.microsoft.com/en-us/exchange/troubleshoot/email-delivery/fix-issues-with-printers-scanners-and-lob-applications-that-send-email-using-off#fix-issues-with-smtp-auth-client-submission
Within this web page, search for the text, "Client not authenticated to send mail" to find Microsoft's specific guidance on what to do.
You may notice that it suggest turning off MFA for the account being used to send email.