Method #1
In your System Preferences open Security and Privacy. Make sure "Mac app store" only is not checked. TntConnect should be from "an identified developer". Also, in the area below "Allow apps downloaded from:" see if TntConnect is mentioned and click "Open Anyway".

Method #2
1) Open your Mac's "Disk Utilities" app. Select your "Macintosh HD", and under the "First Aid" tab, click "Repair Disk Permissions".
- Open the Disk Utility application in OS X (located in /Applications/Utilities/)
- Select the disk from the left side menu to repair permissions for
- Go to the “First Aid” tab and click the “Repair Disk Permissions” button and let the process run from start to finish – this may take a while depending on the size and speed of the hard drive

http://osxdaily.com/2015/01/13/repair-disk-permissions-mac-os-x/
2) In Finder, hold down the "option" key while you click "Go". Then click "Library". (If "Library" doesn't appear as a menu item, click on "Home" and then open the Library folder inside it.)
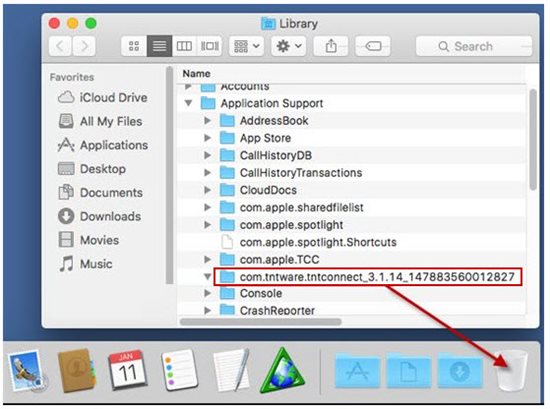
3) Inside the "Application Support" folder, you'll see a folder that starts with "com.tntware.tntconnect_" followed by the version of TntConnect you have installed. Delete that folder:

Now try starting TntConnect.
Method #3
If TntConnect won't start up, it's possible that some issue is preventing it from copying files correctly the first time it runs. To get past this issue, you have to manually copy some files. Here are the steps involved:
1) In Finder, hold down the "option" key while you click "Go". Then click "Library". (If "Library" doesn't appear as a menu item, click on "Home" and then open the Library folder inside it.)
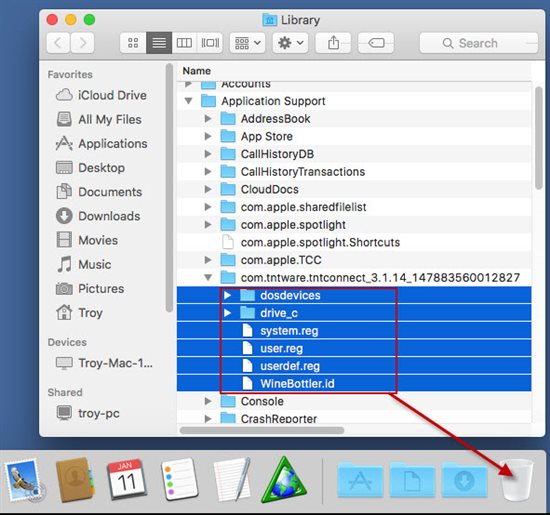
2) Inside the "Application Support" folder, you'll see a folder that starts with "com.tntware.tntconnect_" followed by the version of TntConnect you have installed. Open that folder and delete all the files and folders inside of it:

3) In Finder, under the "File" menu, click on "New Finder Window". Then under the "Go" menu, click on "Applications".
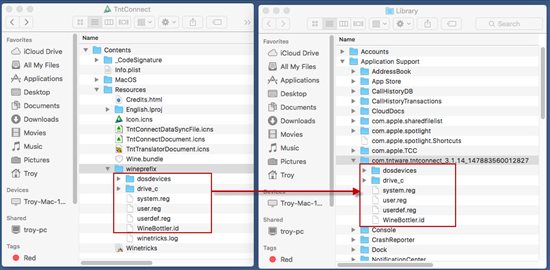
4) Right-click (or "control" click) and choose "Show Package Contents". This will open the TntConnect application to show you the internal files.
5) Inside the "Contents" folder, open "Resources" and then "wineprefix". Copy the files inside of "wineprefix" into the "Library / Application Support / com.tntware.tntconnect_..." you opened in Step 2.

Now TntConnect should start up.