This topic is available on video!
View > Video: Transfer Batches
Transfer Batches
Many ministries allow their staff members to transfer funds from one staff member or ministry designation to another. A Transfer batch is similar to a donation batch, but simply transfers funds from one responsibility centre to another. The main advantage of doing transfers inside of DonorWise instead of merely in the General ledger is that the staff and ministries will have a clear record of the donor contact information (name and address) and this information will flow to them through TntMPD and the Staff Portal.
Since account transfers are typically recurring and/or non-ending, most ministries keep the list of transfers in an Excel file. This Excel file can be exported to a .csv file and used to create an import transfer batch.
Read More > Creating a new Transfer Batch (Import)
Ways that a Transfer batch differs from a regular (Donation) batch:
1.Transfers cannot be mixed with other payment types.

2.On the batch entry screen, the From: and To: lines are both designations. (In a normal batch, the From: line is a donor, and external funds are implied.). In this batch, both lines will use the Designation drop-down list for the Name search.

3.The Chart of Accounts used in the transaction will not appear in the batch entry rows. Only the receiving designation's responsibility center will appear. The Chart of Accounts is defined in the System Setup (shown below).
The option to allow transfers and the selection of the Chart of Account used for the transactions is controlled in the System Setup.
Read More > Journal Tab
Read More
Creating a new Transfer Batch (Manually)
Creating a new Transfer Batch (Import)
This topic is available on video!
View > Video: Transfer Batches
Creating a new Transfer batch
1.Select the <New Batches> link.

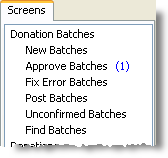
If any of the items in the Donation Batches list has a number next to it, that indicates the number of pending items in that category.
After selecting this list, you will see a list of all batches (if any) currently in progress.

2.Press the <New Batch> button.

3.Fill out the required information for the Batch Header.

Description
|
Enter a Description for the batch – one that describes the kind of batch or that helps to identify it from other batches. A description like “Batch” will not do this.
|
Period
|
Enter the Period in which the batch should be posted. For the first batch, DonorWise will default to the period that is closest to the current date, after that, it will default to the period of the last batch that was entered.
|
Transaction Date
|
Enter the Transaction Date. The date should coincide with the batch period. The transaction date will become the default date for the first item that is entered. Each subsequent row will have as a default date the date of the row above it.
|
4.Press the <Next> button.
5.Select the "TRANSFER" payment type and enter the amount of the batch.

If you attempt to enter any other payment type, DonorWise will alert you with an error message.

6.Press the <OK> button.
7.Enter the items in the batch.
On the batch entry screen, the From: and To: lines are both designations. (In a normal batch, the From: line is a donor.). Both lines will use the Designation drop-down list.

8.Once the total of the items equals the totals amounts entered in the Header, the "Mark Complete" button will be available for you to complete the batch.
9.Press the <Mark Complete> button.

10.The batch will now move to the "Approve Batches" list.
Note: Completed batches are still editable. They cannot be edited after they are approved.
Using Excel to keep your monthly transfers list
The easiest way to maintain a list of account transfers for your staff (or any designation) is with an Excel file.
Creating a new Import Transfer batch
1.Prepare your Excel file.
Field Name (type exactly as shown for required fields)
|
Required?
|
Description
|
Payment Type Code
|
Yes
|
Must be TRANSFER
|
Donor ID
|
Yes
|
This is the designation that is giving the gift
|
Designation ID
|
Yes
|
This is the designation that is receiving the gift
|
Tendered Amount
|
Yes
|
This is the amount of the gift (in your base currency)
|
From
|
No
|
For your reference, as it makes it easier to identify the name of the donor
|
To
|
No
|
For your reference, as it makes it easier to identify the name of the designation
|
End Date
|
No
|
For your records. Sort each month by this field so that you know when to stop a transfer. For transfers with no end date, select a date far in the future.
|
Here is an example of what the Excel file would look like:

2.Save as a .csv file.

Importing the Transfer Batch
3.Select the <New Batches> screen.

4.Press the <Import Batch> button.

5.Enter a Description (such as “Import Transfers”—use the same name every month for consistency). Select the accounting period and date. This date will apply to all transfers in the batch. Press the <Next> button.

6.Press the <Browse> button. Select the .csv file. (Double-click or press the <Open> button.)

7.Press the <Next> button.

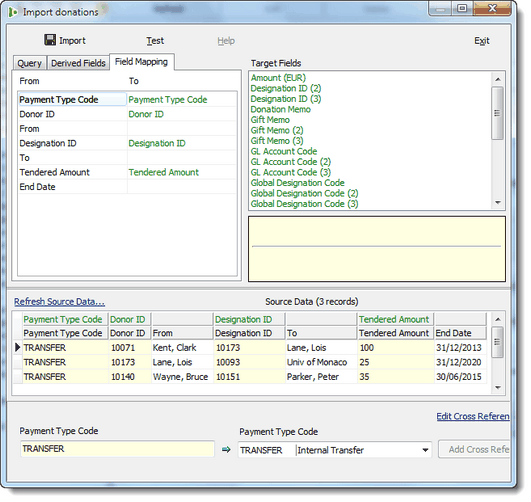
8.The Import donations screen will show all of the fields, with the four required fields already selected (if you typed them exactly). At the bottom of the screen is the data that will import. (Notice that the From, To, and End Date columns do not have headers; these columns will not import into the batch.)

9.Press the <Test> button to test for accuracy.
10.Press the <Import> button to complete the import. The rest of the steps are the same as a normal bank transfer batch.
Read More
Transfer Batches
Creating a new Transfer Batch (Manually)
Exercises
Create a Transfer Batch (Manually)
1.Enter the following transfers by creating a manual transfer batch.
2.Create, complete, approve, and post the batch.
Description
|
Transfer Batches
|
Period
|
Use the current Open period
|
Date
|
Use today's date
|
Payment Type
|
Use "TRANSFER"
|
Amount
|
€ 300
(Euros are the default currency in the sample database)
|
Amount
|
Payment Type
|
Donor
|
Donor ID
|
Designation
|
Designation ID
|
50 €
|
TRANSFER
|
Clark Kent
|
10139
|
Bruce Wayne
|
10140
|
50 €
|
TRANSFER
|
Bruce Wayne
|
10140
|
Peter Parker
|
10151
|
50 €
|
TRANSFER
|
Peter Parker
|
10151
|
Bob Parr
|
10071
|
50 €
|
TRANSFER
|
Bob Parr
|
10071
|
Clark Kent
|
10139
|
100 €
|
TRANSFER
|
Clark Kent
|
10139
|
University of Monaco
|
10093
|
Create a Transfer Batch (Import)
3.Create an Excel file with the same transfers as above.
Your Excel file should look like this, but use the information from the above table. Use December 31, 2020, as the end-date for all of the transfers.

4.Save the file as a .csv file.
5.Create a new transfer import batch and import the .csv file.
If you need help creating the transfer batch or the Excel file, press F1 and search for "Create a new Transfer Batch".